版本声明
结论先行
本文将从 CLI(Command Line
Interface)命令行工具的概述讲起,介绍一个优秀的命令行工具应该具备的功能和特性。然后介绍
Rust 中一个非常优秀的命令行解析工具 clap
经典使用方法,并利用 clap 实现一个类似于 curl
的工具 httpie。文章最后还将 clap 于 Go
语言中同样优秀的命令行解析工具 cobra
进行一个简单对比,便于读者进一步体会 clap
的简洁和优秀。
本文将包含以下几个部分:
CLI 概述 :从 CLI
的基本概念出发,介绍优秀命令行工具应该具备的功能特性,并以 curl
作为经典范例进行说明。详细介绍 clap :基于 clap 官方文档,分别详细介绍
clap 以 derive 和 builder 两个方式构建 cli 的常用方法。实战 httpie :参考陈天老师的《Rust
编程第一课》,用最新的 clap 版本(1.7.6)实现 httpie 工具。对比
cobra :从设计理念和目标、功能特点、使用场景等方面简要对比 clap
和 Go 流行的命令行解析库 cobra。
特此声明,本文包含 AI 辅助生成内容,如有错误遗漏之处,敬请指出。
CLI 概述
CLI(Command Line
Interface,命令行界面)是一种允许用户通过文本命令与计算机程序或操作系统进行交互的接口。与图形用户界面(GUI,Graphical
User Interface)相比,CLI
不提供图形元素,如按钮或图标,而是依赖于文本输入。用户通过键盘输入特定的命令行指令,命令行界面解释这些指令并执行相应的操作。
一款优秀的 CLI
工具应该具备以下的功能和特性,以提升用户体验和效率:
一个优秀的命令行工具(CLI, Command Line
Interface)应该具备以下功能和特性,以提升用户体验和效率:
直观易用 :
简洁的命令语法 :命令和参数的设计应直观易懂,方便用户记忆和使用。自动补全 :支持命令和参数的自动补全功能,提高用户输入效率。命令别名 :提供常用命令的简短别名,减少输入的工作量。 强大的帮助系统 :
详细的帮助文档 :每个命令和参数都应有清晰的说明文档。示例使用方式 :提供常见的使用示例,帮助用户快速理解和应用。内置帮助命令 :通过如--help或-h参数轻松访问帮助信息。 错误处理与反馈 :
清晰的错误信息 :出现错误时,提供明确、具体的错误信息,帮助用户快速定位问题。建议和解决方案 :在可能的情况下,给出错误解决的建议或自动修复选项。 高效的执行和输出 :
快速响应 :命令执行应迅速,减少用户等待时间。格式化的输出 :提供易于阅读和解析的输出格式,如表格、JSON
或 XML 等。输出过滤和排序 :允许用户根据需要过滤和排序输出结果,提高信息的查找效率。 跨平台兼容 :
多平台支持 :能够在不同的操作系统上运行,如
Windows、macOS、Linux 等。环境适应性 :自动适应不同的终端环境和字符编码,确保输出显示正确。 安全性 :
安全的默认设置 :默认配置应强调安全,避免暴露敏感信息。数据加密 :在处理敏感信息(如密码)时,应使用加密手段保护数据安全。 版本管理 :
版本控制 :提供命令查看工具版本,支持多版本共存或升级。向后兼容 :新版本应尽量保持与旧版本的兼容性,避免破坏用户现有的工作流程。
这些特性不仅能够提高用户的工作效率,还能增强用户体验,使命令行工具更加强大和易用。
下面我们以 curl 为例,看看优秀的 CLI
工具大概长什么样子。
curl
是一种命令行工具和库,用于传输数据。它支持多种协议,包括
HTTP、HTTPS、FTP、FTPS、SCP、SFTP、TFTP、TELNET、DICT、LDAP、LDAPS、IMAP、POP3、SMTP
和 RTSP 等。curl
是一个非常强大和灵活的工具,广泛应用于自动化脚本、系统测试、数据收集和许多其他用途。
进入终端,我们可以用下面命令查看 curl 的说明文档:
1
2
3
4
5
6
7
8
9
10
11
12
13
14
15
16
17
18
➜ ~ curl --help Usage: curl [options...] <url> -d, --data <data> HTTP POST data -f, --fail Fail fast with no output on HTTP errors -h, --help <category> Get help for commands -i, --include Include protocol response headers in the output -o, --output <file> Write to file instead of stdout -O, --remote-name Write output to a file named as the remote file -s, --silent Silent mode -T, --upload-file <file> Transfer local FILE to destination -u, --user <user:password> Server user and password -A, --user-agent <name> Send User-Agent <name> to server -v, --verbose Make the operation more talkative -V, --version Show version number and quit This is not the full help , this menu is stripped into categories. Use "--help category" to get an overview of all categories. For all options use the manual or "--help all" .
使用示例:
下载文件: 1 curl -O http://example.com/file.txt
发送 POST 请求: 1 curl -d "param1=value1¶m2=value2" http://example.com/resource
使用 HTTPS 并忽略证书验证: 1 curl -k https://example.com
使用基本认证: 1 curl -u username:password http://example.com
curl
的这些特性使其成为开发者、系统管理员和自动化脚本中广泛使用的工具之一。
clap
概述
clap,代表 Command Line Argument
Parser ,是一个旨在创建直观、易用且功能强大的命令行界面的 Rust
库。截至目前(2024.2),clap 已经发展到了 4.5.1
版本,它通过简化命令行参数的处理,让开发者能更专注于应用逻辑的构建。
clap 之所以在 Rust
社区如此流行,得益于以下几个优点:
1. 易于使用
clap
的设计理念是让命令行参数的解析变得简单而直观。即使是没有经验的开发者也能快速上手,通过几行代码就能实现复杂的命令行参数解析。
2. 功能丰富
clap
提供了广泛的功能来满足各种命令行解析需求,包括但不限于:
自动生成的帮助信息 :clap
能根据定义的参数自动生成帮助信息,包括参数的说明、类型、默认值等。强大的错误提示 :当用户输入无效的命令行参数时,clap
会提供清晰且有用的错误提示,帮助用户快速定位问题。参数验证 :开发者可以为参数设定验证规则,确保输入的参数符合预期。复杂的命令结构 :支持子命令的嵌套,允许构建复杂的命令行应用结构。自定义派生 :通过 clap
的派生宏,可以简化命令行解析器的定义,使代码更加清晰。
3. 高度可定制
clap
允许开发者高度定制命令行解析的行为和外观,包括自定义帮助信息的格式、控制错误消息的显示方式等。这种灵活性意味着你可以根据应用程序的需求调整
clap 的行为。
4. 性能优异
尽管 clap
功能强大,但它仍然非常注重性能。clap
经过优化,以尽可能少的性能开销处理命令行参数。
5. 活跃的社区支持
clap 有一个非常活跃的社区,在 GitHub
上不断有新的贡献者加入。这意味着 clap
不断地得到改进和更新,同时也有大量的社区资源可供参考。
Derive vs Builder (1) 初探
clap 提供了 2 种构建命令行的方式,分别为
Derive 和
Builder。顾名思义,Derive
就是利用宏强大的功能来构建命令行,而 Builder
则采用构建者模式链式构建命令行工具。
在这里我们先给出示例来直观感受这 2 种构建方式的不同:
Derive:
1
2
3
4
5
6
7
8
9
10
11
12
13
14
15
16
#[derive(Parser)] #[command(version, author, about, long_about = None)] struct Cli { name: String , #[arg(short, long)] age: Option <i8 >, } fn main () { let cli = Cli::parse (); println! ("name: {}" , cli.name); println! ("age: {:?}" , cli.age); }
Builder:
1
2
3
4
5
6
7
8
9
10
11
12
13
14
15
fn main () { let matches = Command::new ("myapp" ) .version ("1.0.0" ) .author ("hedon" ) .about ("this is the short about" ) .long_about ("this is the long about" ) .arg (arg!([NAME]).required (true ).help ("Specify your name" )) .arg (arg!(-a --age <AGE>) .value_parser (clap::value_parser!(u8 )) .help ("Specify your age optionally" )) .get_matches (); println! ("name: {:?}" , matches.get_one::<String >("NAME" )); println! ("age: {:?}" , matches.get_one::<u8 >("age" )); }
这 2 个程序都实现了相同的功能,使用 --help
,输出的内容大致都如下:
1
2
3
4
5
6
7
8
Usage: derive [OPTIONS] <NAME> Arguments: <NAME> Specify your name Options: -a, --age <AGE> Specify your age optionally -h, --help Print help
通过观察,可以发现 Derive 模式下,宏中的每一个属性,如
version、author 等,都对应到 Builder
模式下一个同名的函数。
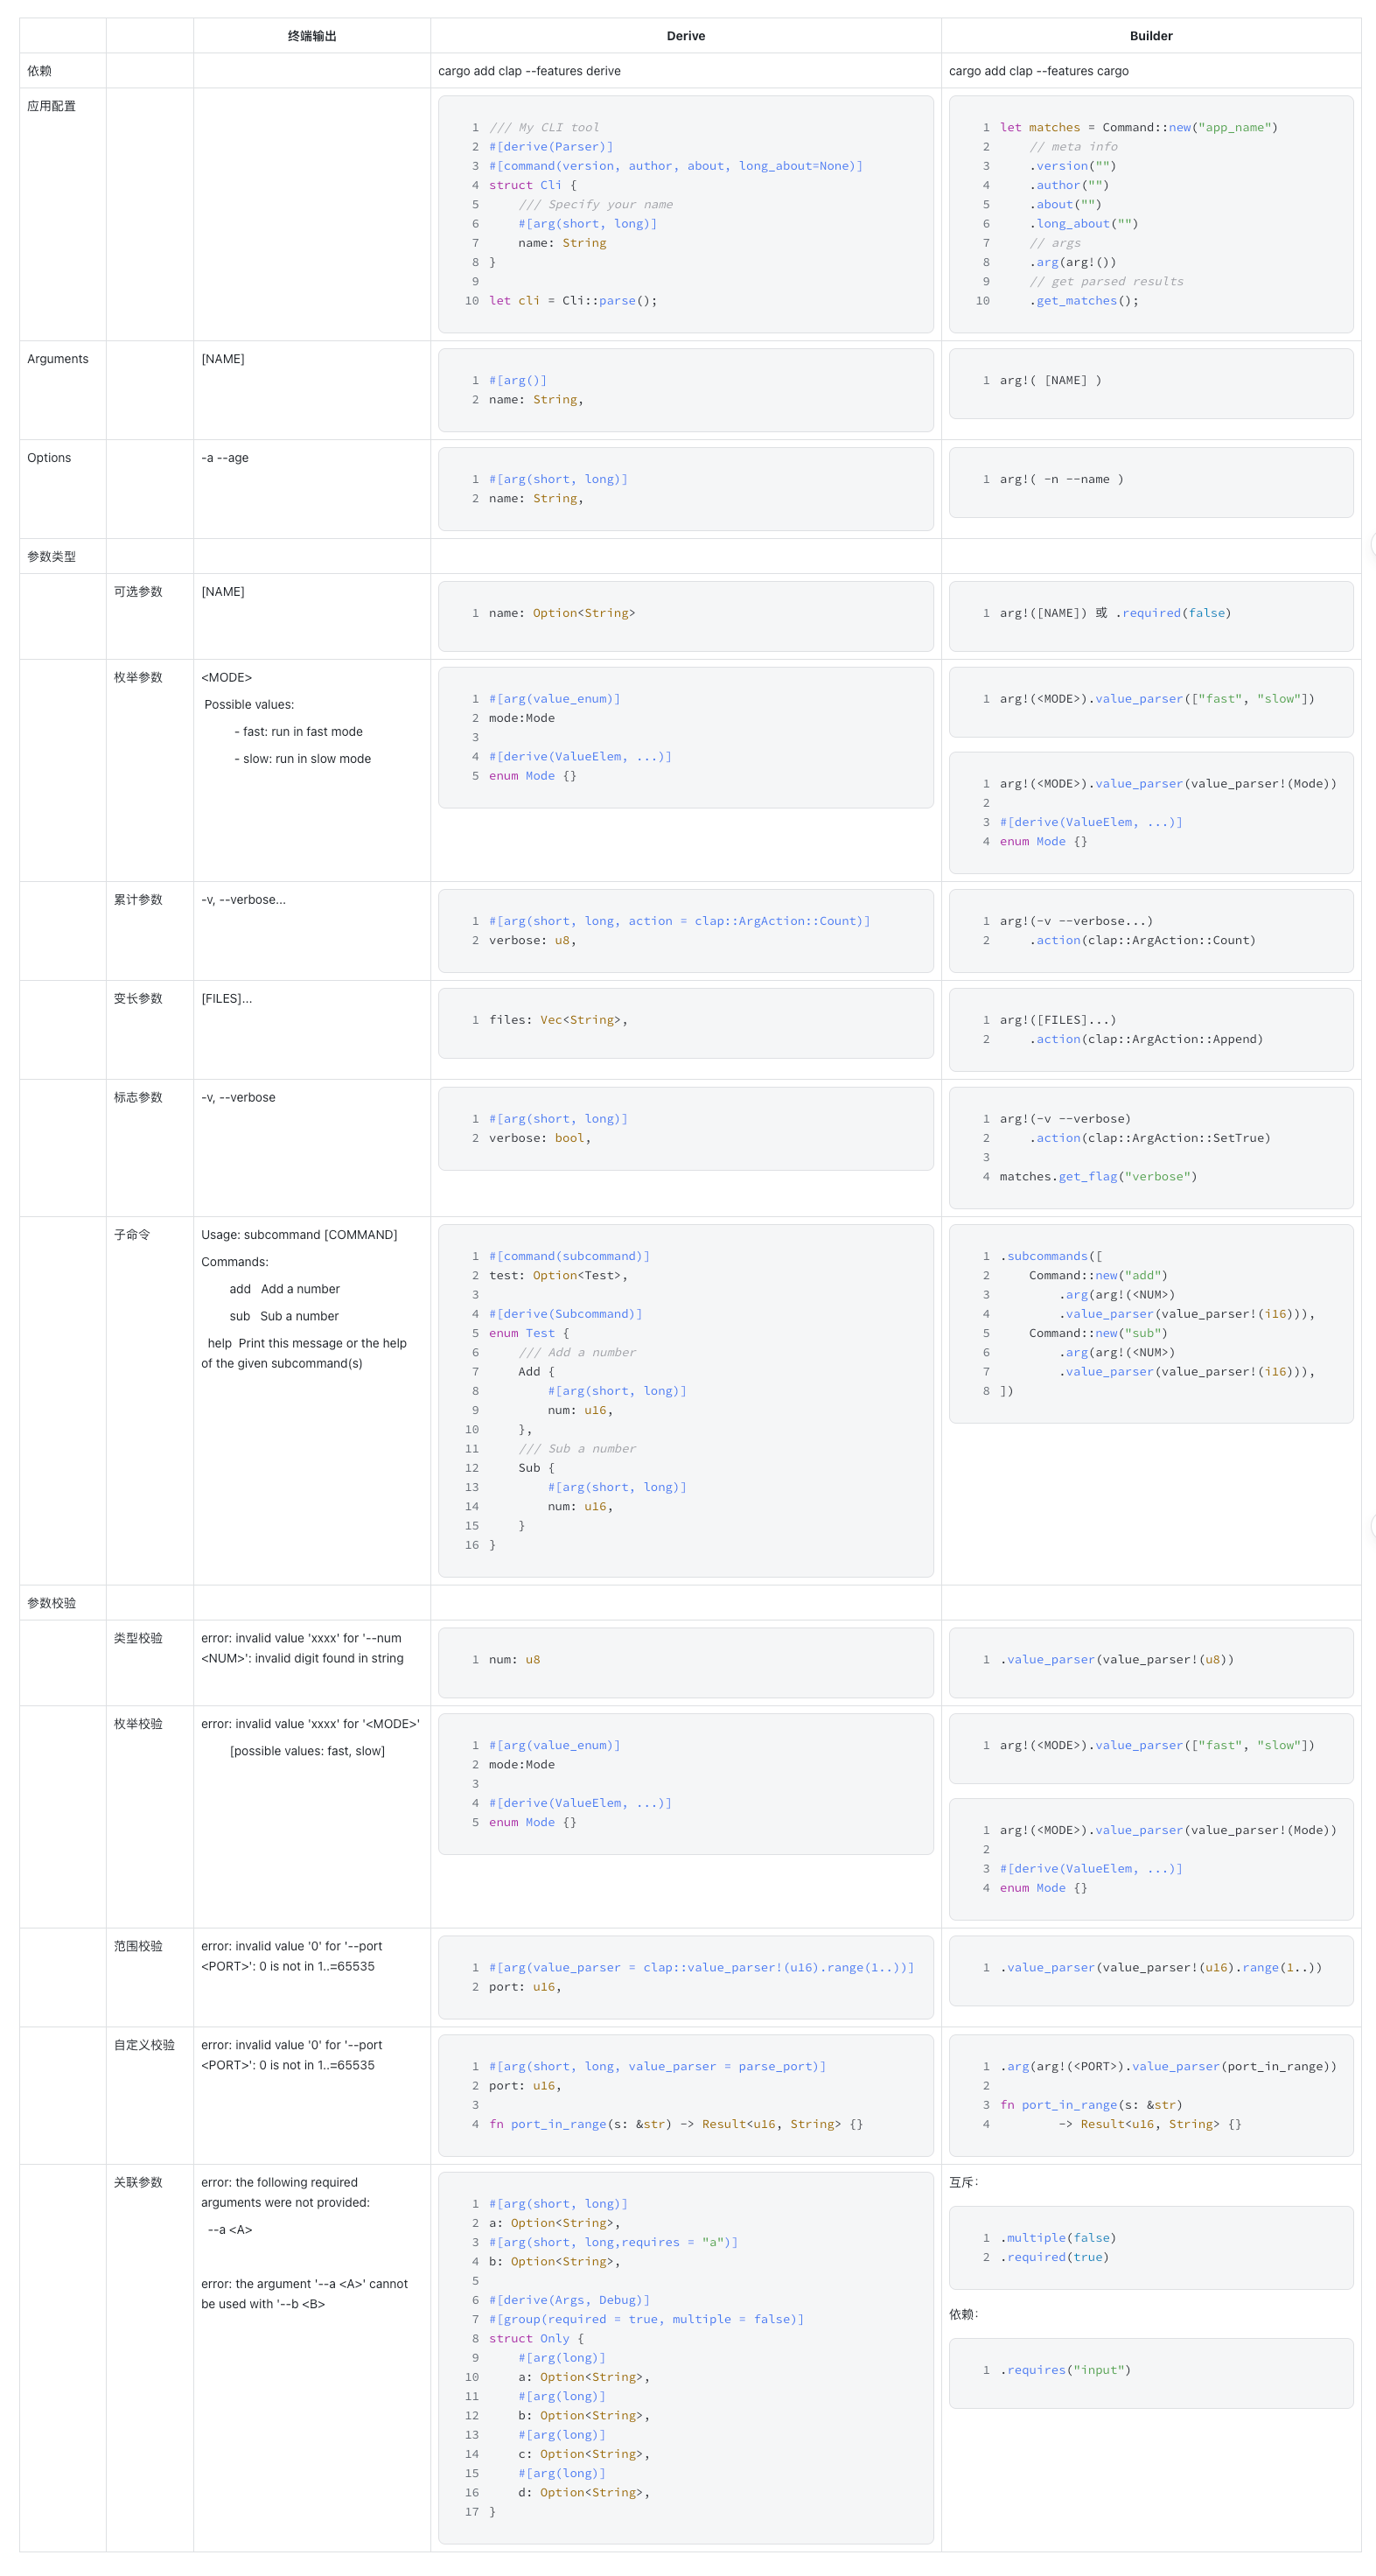
下面我们将从「应用配置」 、「参数类型」 和「参数校验」 三个方面,分别介绍
clap 中 Derive 和 Builder 两种模式构建 CLI 的常用方法。
特别说明:后续的例子均在 examples
目录下实现,故编译和执行命令都包含 example。
目录结构大概如下:
1
2
3
4
5
6
7
8
9
10
11
12
➜ learn-clap git:(master) ✗ tree . ├── Cargo.lock ├── Cargo.toml ├── examples │ ├── optional.rs ├── src │ └── main.rs └── target └── release └── examples └── optional
Derive
要使用 clap 的 Derive 模式,需要:
1 cargo add clap --features derive
1. 应用配置
我们需要定义一个 strut 来表示我们的
application,利用它来承载应用的参数:
1 2 3 4 5 6 7 8 9 10 11 12 13 14 15 16 17 #[derive(Parser)] #[command(version, author, about, long_about = None)] struct Cli { name: String , #[arg(short, long)] age: Option <i8 >, } fn main () { let cli = Cli::parse (); println! ("name: {}" , cli.name); println! ("age: {:?}" , cli.age); }
#[derive(Parser)] 是一个过程宏(procedural
macro),用于自动为结构体实现 clap::Parser
trait。这使得该结构体可以用来解析命令行参数。
使用
#[derive(Parser)],你可以简化命令行解析的代码,因为
clap 会根据结构体的字段自动生成命令行解析的逻辑。
每个字段都对应一个命令行参数,字段的类型和属性用来决定参数的解析方式和验证规则。
#[command(version, about, long_about = None)]
属性用于为整个命令行程序提供元信息,它支持以下几个元素:
#[command] 支持的元素
#[arg(short, long)]
属性用于配置命令参数的元信息,它支持以下几个属性:
属性
方法
默认值/行为
备注
id
Arg::id
field’s name
当属性不存在时,使用字段名
value_parser
Arg::value_parser
auto-select based on field type
当属性不存在时,会基于字段类型自动选择实现
action
Arg::action
auto-select based on field type
当属性不存在时,会基于字段类型自动选择动作
help
Arg::help
Doc comment summary
当属性不存在时,使用文档注释摘要
long_help
Arg::long_help
Doc comment with blank line, else nothing
当属性不存在时,使用文档注释,如果有空行
verbatim_doc_comment
Minimizes preprocessing
-
将文档注释转换为 help/long_help 时最小化预处理
short
Arg::short
no short set
当属性不存在时,没有短名称设置
long
Arg::long
no long set
当属性不存在时,没有长名称设置
env
Arg::env
no env set
当属性不存在时,没有环境变量设置
from_global
Read Arg::global
-
无论在哪个子命令中,都读取 Arg::global 参数
value_enum
Parse with ValueEnum
-
使用 ValueEnum 解析值
skip
Ignore this field
fills the field with Default::default()
忽略此字段,用 <expr> 或 Default::default() 填充
default_value
Arg::default_value
Arg::required(false)
设置默认值,并将 Arg 设置为非必须
default_value_t
Arg::default_value
Arg::required(false)
要求 std::fmt::Display 与 Arg::value_parser 相匹配
default_values_t
Arg::default_values
Arg::required(false)
要求字段类型为 Vec<T>,T 实现 std::fmt::Display
default_value_os_t
Arg::default_value_os
Arg::required(false)
要求 std::convert::Into<OsString>
default_values_os_t
Arg::default_values_os
Arg::required(false)
要求字段类型为 Vec<T>,T 实现
std::convert::Into<OsString>
2. 参数类型
2.1 Arguments & Options
从上面这个输出样例中:
1
2
3
4
5
6
7
8
9
10
the example of clap derive Usage: derive [OPTIONS] <NAME> Arguments: <NAME> Specify your name Options: -a, --age <AGE> Specify your age optionally -h, --help Print help
可以看到跟在命令后面有 2 中参数类型:
Arguments : 直接在命令后面指定值,如
cmd hedon,有严格的顺序要求。Options : 需要用 -{short} 或
--{long} 来指定是哪个参数,无严格的顺序要求。
它们的定义区别就是是否使用了 #[arg]:
Options : 指定了 short 或 long。Arguments : 没有 short 和 long。
1
2
3
4
5
6
7
8
9
#[derive(Parser)] struct Cli { name: String , #[arg(short, long)] age: u8 , }
2.2 可选参数
可以使用 Option 来实现可选参数:
1
2
3
4
5
6
7
8
9
10
11
12
13
14
15
16
use clap::Parser;#[derive(Parser)] #[command(version, author, about, long_about = None)] struct Cli { name: Option <String >, #[arg(short, long)] age: Option <u8 >, } fn main () { let cli = Cli::parse (); println! ("name: {:?}" , cli.name); println! ("age: {:?}" , cli.age); }
编译:
1 cargo build --example optional --release
执行:
1 /target/release/examples/optional --help
输出:
1
2
3
4
5
6
7
8
9
10
11
this is the about from Cargo.toml Usage: optional [OPTIONS] [NAME] Arguments: [NAME] Options: -a, --age <AGE> -h, --help Print help -V, --version Print version
测试:
1
2
3
4
5
6
7
8
9
10
11
12
➜ learn-clap git:(master) ✗ ./target/release/examples/optional name: None age: None ➜ learn-clap git:(master) ✗ ./target/release/examples/optional -a 1 name: None age: Some(1) ➜ learn-clap git:(master) ✗ ./target/release/examples/optional hedon name: Some("hedon" ) age: None ➜ learn-clap git:(master) ✗ ./target/release/examples/optional hedon -a 18 name: Some("hedon" ) age: Some(18)
2.3 枚举参数
可以使用 enum 搭配 value_enum
来实现多选一参数,并限制可选参数的取值。
1
2
3
4
5
6
7
8
9
10
11
12
13
14
15
16
17
18
19
20
21
22
23
24
25
use clap::{Parser, ValueEnum};#[derive(Parser)] #[command(version, author, about, long_about = None)] struct Cli { #[arg(value_enum)] mode: Mode, } #[derive(Copy, Clone, PartialEq, Eq, PartialOrd, Ord, ValueEnum)] enum Mode { Fast, Slow, } fn main () { let cli = Cli::parse (); match cli.mode { Mode::Fast => println! ("fast!!!!!" ), Mode::Slow => println! ("slow......" ), } }
输出:
1
2
3
4
5
6
7
8
9
10
11
12
13
14
15
16
Usage: enum <MODE> Arguments: <MODE> Choose the program mode run in Possible values: - fast: run in fast mode - slow: run in slow mode Options: -h, --help Print help (see a summary with '-h' ) -V, --version Print version
2.4 累计参数
累积参数允许用户通过重复指定同一个标志(例如
-d)来累加值或效果,通常用于控制命令行应用的详细级别(verbosity
level)或其他需要根据次数变化的行为。
在很多命令行工具中,累积参数常见于控制日志输出的详细程度。例如,一个
-v(verbose)标志可能每被指定一次,就增加一层详细级别。所以,-vvv(等价于
-v -v -v) 会比单个 -v
提供更多的详细信息。
在 clap 中可以通过 clap::ArgAction::Count
来实现这种累积参数。
1
2
3
4
5
6
7
8
9
10
11
12
13
use clap::Parser;#[derive(Parser)] #[command(version, author, about, long_about = None)] struct Cli { #[arg(short, long, action = clap::ArgAction::Count)] verbose: u8 , } fn main () { let cli = Cli::parse (); println! ("verbose: {}" , cli.verbose); }
输出:
1
2
3
4
5
6
7
8
9
10
11
12
13
➜ learn-clap git:(master) ✗ ./target/release/examples/accurate --help this is the about from Cargo.toml Usage: accurate [OPTIONS] Options: -v, --verbose... -h, --help Print help -V, --version Print version ➜ learn-clap git:(master) ✗ ./target/release/examples/accurate -v verbose: 1 ➜ learn-clap git:(master) ✗ ./target/release/examples/accurate -vvvv verbose: 4
2.5 变长参数
有时候我们希望接收变长参数,比如说:
这个时候可以使用 Vec<> 来实现。
1
2
3
4
5
6
7
8
9
10
11
12
use clap::Parser;#[derive(Parser)] #[command(version, author, about, long_about = None)] struct Cli { files: Vec <String >, } fn main () { let cli = Cli::parse (); println! ("files: {:?}" , cli.files); }
输出:
1
2
3
4
5
6
7
8
9
10
11
12
13
14
15
16
17
18
19
➜ learn-clap git:(master) ✗ ./target/release/examples/var_length --help this is the about from Cargo.toml Usage: var_length [FILES]... Arguments: [FILES]... Options: -h, --help Print help -V, --version Print version ➜ learn-clap git:(master) ✗ ./target/release/examples/var_length files: [] ➜ learn-clap git:(master) ✗ ./target/release/examples/var_length file1 files: ["file1" ] ➜ learn-clap git:(master) ✗ ./target/release/examples/var_length file1 file2 files: ["file1" , "file2" ] ➜ learn-clap git:(master) ✗ ./target/release/examples/var_length file1 file2 file3 files: ["file1" , "file2" , "file3" ]
2.6 标志参数
对于标志参数,只要指定类型为
bool,就可以自动实现了。
1
2
3
4
5
6
7
8
9
10
11
12
13
use clap::Parser;#[derive(Parser)] #[command(version, author, about, long_about = None)] struct Cli { #[arg(short, long)] verbose: bool , } fn main () { let cli = Cli::parse (); println! ("verbose: {}" , cli.verbose); }
输出:
1
2
3
4
5
6
7
8
9
10
11
➜ learn-clap git:(master) ✗ ./target/release/examples/flag --help Usage: flag [OPTIONS] Options: -v, --verbose -h, --help Print help -V, --version Print version ➜ learn-clap git:(master) ✗ ./target/release/examples/flag verbose: false ➜ learn-clap git:(master) ✗ ./target/release/examples/flag -v verbose: true
2.7 子命令
在更复杂的命令行工具中,除了主命令,还有子命令,甚至子命令下面还有子命令,其实就是一颗命令树。
command tree
在 clap 中可以使用 #[command(subcommand)]
搭配 #[derive(Subcommand)] 实现子命令功能。
1
2
3
4
5
6
7
8
9
10
11
12
13
14
15
16
17
18
19
20
21
22
23
24
25
26
27
28
29
30
31
32
33
use clap::{Parser, Subcommand};#[derive(Parser)] #[command(version, author, about, long_about = None)] struct Cli { #[command(subcommand)] test: Option <Test>, } #[derive(Subcommand)] enum Test { Add { #[arg(short, long)] num: u16 , }, Sub { #[arg(short, long)] num: u16 , } } fn main () { let cli = Cli::parse (); if let Some (test) = cli.test { match test { Test::Add {num} => println! ("test add num: {:?}" , num), Test::Sub {num} => println! ("test sub num: {:?}" , num), } } }
输出:
1
2
3
4
5
6
7
8
9
10
11
12
13
14
15
16
17
18
19
20
21
22
23
24
25
➜ learn-clap git:(master) ✗ ./target/release/examples/subcommand --help this is the about from Cargo.toml Usage: subcommand [COMMAND] Commands: add Add a number sub Sub a number help Print this message or the help of the given subcommand(s) Options: -h, --help Print help -V, --version Print version ➜ learn-clap git:(master) ✗ ./target/release/examples/subcommand add --help Add a number Usage: subcommand add --num <NUM> Options: -n, --num <NUM> -h, --help Print help ➜ learn-clap git:(master) ✗ ./target/release/examples/subcommand add -n 1 test add num: 1➜ learn-clap git:(master) ✗ ./target/release/examples/subcommand sub -n 2 test sub num: 2
3. 参数校验
3.1 类型校验
可以发现,使用 Derive
模式的时候,我们在参数后面指定参数类型的时候,clap
就会对我们输入参数进行类型检查,不匹配的时候会输出丰富的报错信息和指导建议。
1
2
3
error: invalid value 'xxxx' for '--num <NUM>' : invalid digit found in string For more information, try '--help' .
默认支持:
原生类型:bool, String,
OsString,
PathBuf、usize、isize
范围数据:u8, i8, u16,
i16, u32, i32, u64,
i64
实现了 ValueEnum 的 enum 类型
实现了
From<OsString>、From<&OsStr>
、FromStr 的类型
这是因为他们都实现了 TypedValueParser
trait,你自定义的类型也可以实现这个
triat,这样就可以自动进行类型校验了。
clap 还提供了一些更加严格的参数校验功能。👇🏻
3.2 枚举校验
对于实现 ValueEnum
的枚举类型,如果输入的值不是枚举中定义的,则 clap
会报错并提示可选值。
我们复用上面介绍「多选一参数」的代码:
1
2
3
4
5
6
7
8
9
10
11
12
13
14
15
16
17
18
19
20
21
22
23
24
25
use clap::{Parser, ValueEnum};#[derive(Parser)] #[command(version, author, about, long_about = None)] struct Cli { #[arg(value_enum)] mode: Mode, } #[derive(Copy, Clone, PartialEq, Eq, PartialOrd, Ord, ValueEnum)] enum Mode { Fast, Slow, } fn main () { let cli = Cli::parse (); match cli.mode { Mode::Fast => println! ("fast!!!!!" ), Mode::Slow => println! ("slow......" ), } }
使用错误的值进行尝试:
1
2
3
4
5
➜ learn-clap git:(master) ✗ ./target/release/examples/enum xxxx error: invalid value 'xxxx' for '<MODE>' [possible values: fast, slow] For more information, try '--help' .
3.3 范围校验
如果你想要实现数字类型范围限制的话,比如端口号参数的范围应该是 [1,
65535],那可以使用
value_parser! = clap::value_parser!(u16).range(1..)
来实现这个功能:
1
2
3
4
5
6
7
8
9
10
11
12
13
use clap::Parser;#[derive(Parser)] #[command(version, author, about, long_about = None)] struct Cli { #[arg(short, long, value_parser = clap::value_parser!(u16).range(1..))] port: u16 , } fn main () { let cli = Cli::parse (); println! ("port: {:?}" , cli.port); }
输出:
1
2
3
4
5
6
7
8
9
10
11
12
13
14
15
16
17
18
19
20
21
22
➜ learn-clap git:(master) ✗ ./target/release/examples/range --help this is the about from Cargo.toml Usage: range --port <PORT> Options: -p, --port <PORT> -h, --help Print help -V, --version Print version ➜ learn-clap git:(master) ✗ ./target/release/examples/range -p 0 error: invalid value '0' for '--port <PORT>' : 0 is not in 1..=65535 For more information, try '--help' . ➜ learn-clap git:(master) ✗ ./target/release/examples/range -p 11111111 error: invalid value '11111111' for '--port <PORT>' : 11111111 is not in 1..=65535 For more information, try '--help' . ➜ learn-clap git:(master) ✗ ./target/release/examples/range -p 1111 port: 1111
在这个例子中,value_parser = clap::value_parser!(u16).range(1..)
的含义可以分为两部分解释:
1. clap::value_parser!(u16)
这部分使用 value_parser! 宏为命令行参数指定了
u16 类型的解析器。这意味着输入的参数值会被尝试解析为无符号
16 位整数(u16)。如果输入不能被成功解析为 u16
类型(例如,输入是非数字字符串或者数字过大/过小而不符合 u16
的范围),clap 会报错并提示用户输入有效的参数值。
2. .range(1..)
这部分进一步限制了参数值的有效范围。.range(1..)
指定了参数值必须大于或等于 1(包含 1),但没有上限。换句话说,任何小于 1
的值都将被认为是无效的,clap
会因此报错并要求用户输入一个符合范围要求的值。这在需要限定参数值为正数时非常有用。
结合起来,value_parser = clap::value_parser!(u16).range(1..)
创建了一个规则,要求命令行参数必须是一个大于或等于 1 的 u16
类型的数值。这在很多场景下都非常有用,比如当你需要用户指定一个正数端口号时。
在 RustRover 中,你可以在 Builder 模式,通过在
clap::value_parser!() 中指定其他的类型,然后输入
. 获得其他类型的内置校验规则。
3.4 自定义校验
对于更复杂的规则,clap 还支持自定义校验规则。比如上面对
port 的校验,也可以自己实现。
1
2
3
4
5
6
7
8
9
10
11
12
13
14
15
16
17
18
19
20
21
22
23
24
25
26
27
28
29
30
31
32
use std::ops::RangeInclusive;use clap::Parser;#[derive(Parser)] #[command(version, author, about, long_about = None)] struct Cli { #[arg(short, long, value_parser = parse_port)] port: u16 , } const PORT_RANGE: RangeInclusive<usize > = 1 ..=65535 ;fn parse_port (s: &str ) -> Result <u16 , String > { let port : usize = s .parse () .map_err (|_| format! ("`{s}` isn't a port number`" ))?; if PORT_RANGE.contains (&port) { Ok (port as u16 ) } else { Err (format! ( "port not in range {}-{}" , PORT_RANGE.start (), PORT_RANGE.end (), )) } } fn main () { let cli = Cli::parse (); println! ("port: {:?}" , cli.port); }
在代码中,我们直接使用 value_parser = parse_port
来指定自定义的校验规则。
我们自定义的校验规则为:
1 fn parse_port (s: &str ) -> Result <u16 , String > {}
它需要满足:
入参是 &str
出参是 Result<参数类型, String>
可以测试输出:
1
2
3
4
5
6
7
8
9
10
11
12
13
14
15
16
17
18
19
20
21
22
➜ learn-clap git:(master) ✗ ./target/release/examples/custom --help this is the about from Cargo.toml Usage: custom --port <PORT> Options: -p, --port <PORT> -h, --help Print help -V, --version Print version ➜ learn-clap git:(master) ✗ ./target/release/examples/custom -p xxx error: invalid value 'xxx' for '--port <PORT>' : `xxx` isn't a port number` For more information, try ' --help '. ➜ learn-clap git:(master) ✗ ./target/release/examples/custom -p 0 error: invalid value ' 0' for ' --port <PORT>': port not in range 1-65535 For more information, try ' --help '. ➜ learn-clap git:(master) ✗ ./target/release/examples/custom -p 9527 port: 9527
3.5 关联参数
有时候参数直接还有关联关系,比如说:
依赖:必须存在 -a 参数,-b
参数才有意义,即要使用 -b 参数时,必须指定 -a
参数。
互斥:-a 和 -b 只能同时存在一个。
可以使用 requires 实现依赖关系:
1
2
3
4
5
6
7
8
9
10
11
12
13
14
15
16
17
use clap::Parser;#[derive(Parser)] #[command(version, author, about, long_about = None)] struct Cli { #[arg(short, long)] a: Option <String >, #[arg(short, long,requires = "a" )] b: Option <String >, } fn main () { let cli = Cli::parse (); println! ("a: {:?}" , cli.a); println! ("b: {:?}" , cli.b); }
上述代码中,我们在参数 b 中加入了
requires = "a",表示要使用 b 参数必须要有
a 参数。
输出:
1
2
3
4
5
6
7
8
9
10
11
12
13
14
15
16
17
18
➜ learn-clap git:(master) ✗ ./target/release/examples/relation a: None b: None ➜ learn-clap git:(master) ✗ ./target/release/examples/relation -b 1 error: the following required arguments were not provided: --a <A> Usage: relation --a <A> --b <B> For more information, try '--help' . ➜ learn-clap git:(master) ✗ ./target/release/examples/relation -a 1 a: Some("1" ) b: None ➜ learn-clap git:(master) ✗ ./target/release/examples/relation -a 1 -b 2 a: Some("1" ) b: Some("2" )
可以使用 #[group(required = true, mutiple = false)]
来实现互斥关系:
1
2
3
4
5
6
7
8
9
10
11
12
13
14
15
16
17
18
19
20
21
22
23
24
25
26
use clap::{Args, Parser};#[derive(Parser)] #[command(version, author, about, long_about = None)] struct Cli { #[command(flatten)] args: Only, } #[derive(Args, Debug)] #[group(required = true, multiple = false)] struct Only { #[arg(long)] a: Option <String >, #[arg(long)] b: Option <String >, #[arg(long)] c: Option <String >, #[arg(long)] d: Option <String >, } fn main () { let cli = Cli::parse (); println! ("only: {:?}" , cli.args) }
#[command(flattern)] 直接将结构体里面的参数平铺。
#[group]
用于将一组参数归为一个组,required = true 表示必须提供该
group 中的参数,multiple = false
表示只能有一个参数被提供。
测试输出如下:
1
2
3
4
5
6
7
8
9
10
11
12
13
14
15
16
17
18
19
20
21
22
23
24
25
26
27
28
29
30
31
32
33
➜ learn-clap git:(master) ✗ ./target/release/examples/only_one --help this is the about from Cargo.toml Usage: only_one <--a <A>|--b <B>|--c <C>|--d <D>> Options: --a <A> --b <B> --c <C> --d <D> -h, --help Print help -V, --version Print version ➜ learn-clap git:(master) ✗ ./target/release/examples/only_one error: the following required arguments were not provided: <--a <A>|--b <B>|--c <C>|--d <D>> Usage: only_one <--a <A>|--b <B>|--c <C>|--d <D>> For more information, try '--help' . ➜ learn-clap git:(master) ✗ ./target/release/examples/only_one --a 1 only: Only { a: Some("1" ), b: None, c: None, d: None } ➜ learn-clap git:(master) ✗ ./target/release/examples/only_one --a 1 --b 2 error: the argument '--a <A>' cannot be used with '--b <B>' Usage: only_one <--a <A>|--b <B>|--c <C>|--d <D>> For more information, try '--help' . ➜ learn-clap git:(master) ✗ ./target/release/examples/only_one --b 2 only: Only { a: None, b: Some("2" ), c: None, d: None }
Builder
使用 clap 的 Builder
模式,一般情况下不需要额外引入其他的 features:
但是如果要使用 command! 来构建应用的话,需要引入
cargo 这个 features:
1 cargo add clap --features cargo
1. 应用配置
在 Builder 模式下,你可以使用 command!() 或
Command::new("appname") 来构建一个命令行应用,其中
command!() 默认将 appname 设置应用名称,而
Command::new() 必须显示指定 appname。
1
2
3
4
5
6
7
8
9
10
11
12
13
14
15
16
17
18
19
20
21
22
23
24
use clap::{arg, Arg, Command, command, value_parser};fn main () { let matches = Command::new ("MyApp" ) .version ("1.0.0" ) .author ("hedon" ) .about ("This the intro of the cli application" ) .arg (arg!([NAME]).help ("Specify your name" )) .arg ( Arg::new ("age" ).short ('a' ).long ("age" ).value_parser (value_parser!(u8 )) ) .get_matches (); if let Some (name) = matches.get_one::<String >("NAME" ) { println! ("Value for name: {name}" ); } if let Some (age) = matches.get_one::<u8 >("age" ) { println! ("Value for age: {age}" ); } }
这段代码分为以下几个部分:
1. 创建命令行应用实例 :
1 let matches = Command::new ("MyApp" )
这里使用 Command::new
方法创建了一个新的命令行应用实例,命名为 "MyApp"。
2. 配置应用 :
1 2 3 .version ("1.0.0" ) .author ("hedon" ) .about ("This the intro of the cli application" )
接下来,使用链式调用方法配置应用的版本号为
"1.0.0",作者为
"hedon",并添加了一个简短的描述。
这里等价于 Builder 模式下的:
1 #[command(version, author, about)]
3. 添加命令行参数 :
1 2 3 4 .arg (arg!([NAME]).help ("Specify your name" )) .arg ( Arg::new ("age" ).short ('a' ).long ("age" ).value_parser (value_parser!(u8 )) )
这部分代码添加了两个命令行参数:
.arg(arg!([NAME]).required(true).help("Specify your name"))
使用 arg! 宏添加了一个名为 NAME
的必需参数,并提供了一些帮助信息。.arg(Arg::new("age").short('a').long("age").value_parser(value_parser!(u8)))
创建了另一个参数 age,可以通过 -a 或
--age 来指定。这个参数使用了 value_parser
宏来指明它的值应被解析为 u8 类型的数字。
4. 解析命令行参数 :
使用 .get_matches() 方法来解析命令行参数并将结果存储在
matches 变量中。
5. 读取并打印参数值 :
1
2
3
4
5
6
if let Some (name) = matches.get_one::<String >("NAME" ) { println! ("Value for name: {name}" ); } if let Some (age) = matches.get_one::<u8 >("age" ) { println! ("Value for age: {age}" ); }
最后,使用 matches.get_one::<T>("arg_name")
方法尝试获取指定名称的参数值。如果成功找到,则将其打印出来。这里分别尝试获取
"NAME" 和 "age" 参数的值,并使用
println! 宏将它们打印到控制台。
使用 -- help 测试输出如下:
1
2
3
4
5
6
7
8
9
10
11
This the intro of the cli application Usage: app2 [OPTIONS] [NAME] Arguments: [NAME] Specify your name Options: -a, --age <AGE> -h, --help Print help -V, --version Print version
你可以将其与「Derive -
应用配置」进行比较,应该很容易找到它们之间的对应关系。
在 Derive 中 #[command] 和 #[arg]
支持的属性,都可以在 Builder
中找到对应的同名的函数,这里就不赘述了。
2. 参数类型
在 Builder 模式中,配置参数有两种方式:
arg!([-short] [--long] id)
Args::new("id").short('s').long("long")
2.1 Arguments & Options
1
2
3
4
5
Arguments: [NAME] Specify your name Options: -a, --age <AGE>
Argument: 不包含 -{short} 和
--{long}。Options: 包含 -{short} 或
--{long}。
1 2 .arg (arg!([NAME]).help ("Specify your name" )) .arg (arg!(-a --age <AGE>).value_parser (value_parser!(u16 )))
2.2 可选参数
根据约定,<> 表示必须,而 []
表示可选:
1 2 .arg (arg!(<NAME>) .arg (arg!([ADDRESS]))
你也可以使用 .required(bool) 函数明确指出是否必须:
1 .arg (arg!(<NAME>).required (true ))
.required() 的优先级高于 <> 和
[],但是建议你在构建的时候还是遵循约定。
2.3 枚举参数
第 1 种:在 value_parser()
中直接指定可选的枚举参数
1 .arg (arg!(<MODE>).value_parser (["fast, slow" ]))
第 2 种:使用枚举,但是枚举需要实现 ValueEnum
trait
这里又有 2 种方式,你可以向 Derive 一样引入 derive
features,然后直接 #[derive(ValueElem)]
使用默认实现,也可以手动实现。我更倾向于前者。
1
2
3
4
5
6
7
8
9
10
11
12
13
14
15
16
17
18
19
20
21
22
23
24
use clap::{arg, command, value_parser, ValueEnum};fn main () { let matches = command!() .arg ( arg!(<MODE>).value_parser (value_parser!(Mode)).required (true ) ) .get_matches (); match matches.get_one::<Mode>("MODE" ) .expect ("'Mode' is required and parsing will fail if its missing" ){ Mode::Fast => println! ("fast" ), Mode::Slow => println! ("slow" ), } } #[derive(Copy, Clone, Ord, PartialOrd, Eq, PartialEq, ValueEnum)] enum Mode { Fast, Slow, }
2.4 累计参数
使用 clap::ArgAction::Count 设置参数为累计参数,然后使用
get_count(id) 获取参数的值:
1
2
3
4
5
6
7
8
use clap::{arg, command};fn main () { let matches = command!() .arg (arg!(-v --verbose...).action (clap::ArgAction::Count)) .get_matches (); println! ("v count: {:?}" , matches.get_count ("verbose" )); }
这里要注意,arg!() 中参数的定义,也要符合累计参数的格式
-{short} --{long}...。
2.5 变长参数
使用 clap::ArgAction::Append
设置参数为变长参数,然后使用 get_many::<类型>("id")
获取参数的值:
1
2
3
4
5
6
7
8
9
10
11
12
13
14
15
use clap::{arg, Command};fn main () { let matches = Command::new ("append-application" ) .arg (arg!([FILES]...).action (clap::ArgAction::Append)) .get_matches (); let files = matches .get_many::<String >("FILES" ) .unwrap_or_default () .map (|v|v.as_str ()) .collect::<Vec <_>>(); println! ("files: {:?}" , files); }
这里要注意,arg!() 中参数的定义,也要符合变长参数的格式
[arg]|<arg>...。
2.6 标志参数
使用 clap::ArgAction::SetTrue 或
clap::ArgAction::SetFalse 设置参数为标志参数,然后使用
get_flag() 获取参数的值:
1
2
3
4
5
6
7
8
9
10
use clap::{arg, command};fn main () { let matches = command!() .arg (arg!(-d --debug).action (clap::ArgAction::SetTrue)) .arg (arg!(-v --verbose).action (clap::ArgAction::SetFalse)) .get_matches (); println! ("debug: {:?}" , matches.get_flag ("debug" )); println! ("verbose: {:?}" , matches.get_flag ("verbose" )) }
其中:
clap::ArgAction::SetTrue : 设置参数的话,则为
true,否则 false(默认)。clap::ArgAction::SetFalse : 设置参数的话,则为
false,否则 true(默认)。
测试:
1
2
3
4
5
6
7
8
9
➜ learn-clap-builder git:(master) ✗ ./target/release/examples/flag debug: false verbose: true ➜ learn-clap-builder git:(master) ✗ ./target/release/examples/flag -d debug: true verbose: true ➜ learn-clap-builder git:(master) ✗ ./target/release/examples/flag -v debug: false verbose: false
2.7 子命令
可以使用 subcommand(sub_cmd) 和
subcommand([sub_cmd1, sub_cmd2])
来添加子命令,解析的时候使用 matches.subcommand()
匹配子命令,再按照之前的规则解析子命令中对应的参数即可。
1
2
3
4
5
6
7
8
9
10
11
12
13
14
15
16
17
18
19
20
21
22
23
24
use clap::{arg, Command, value_parser};fn main () { let matches = Command::new ("myapp" ) .subcommands ([ Command::new ("add" ) .arg (arg!(<NUM>).value_parser (value_parser!(i16 ))), Command::new ("sub" ) .arg (arg!(<NUM>).value_parser (value_parser!(i16 ))), ]) .get_matches (); match matches.subcommand () { Some (("add" , add_cmd)) => println! ( "'myapp add' was used, num is: {:?}" , add_cmd.get_one::<i16 >("NUM" ), ), Some (("sub" , sub_cmd)) => println! ( "'myapp sub' was used, num is: {:?}" , sub_cmd.get_one::<i16 >("NUM" ), ), _ => unreachable! () } }
3. 参数校验
3.1 类型校验
使用 value_parser!() 在括号中指定类型,clap
就会自动帮我们对参数进行类型校验,当然你在获取参数值
get_one::<类型>() 的时候,类型要对上,否则会
panic。
默认支持:
原生类型:bool, String,
OsString,
PathBuf、usize、isize
范围数据:u8, i8, u16,
i16, u32, i32, u64,
i64
实现了 ValueEnum 的 enum 类型
实现了
From<OsString>、From<&OsStr>
、FromStr 的类型
3.2 枚举校验
2.3 中枚举参数的说明中,已经体现了枚举校验的功能了,这里不赘述。
3.3 范围校验
对于上述提到的「范围数据」,可以使用
value_parser!(类型).range() 进行范围校验。
1
2
arg!(<PORT>) .value_parser (value_parser!(u16 ).range (1 ..))
3.4 自定义校验
value_parser()
中也可以传自定义的校验函数,该函数的签名需要满足的条件跟我们在介绍
Derive 时一样。
1
2
3
4
5
6
7
8
9
10
11
12
13
14
15
16
17
18
19
20
21
22
23
24
25
26
27
use std::ops::RangeInclusive;use clap::{arg, command};fn main () { let matches = command!() .arg (arg!(<PORT>).value_parser (port_in_range)) .get_matches (); println! ("port: {:?}" , matches.get_one::<u16 >("PORT" )) } const PORT_RANGE: RangeInclusive<usize > = RangeInclusive::new (1 , 65535 );fn port_in_range (s: &str ) -> Result <u16 , String > { let port : usize = s .parse () .map_err (|_|format! ("`{s}` is not a port number" ))?; if PORT_RANGE.contains (&port) { Ok (port as u16 ) } else { Err (format! ( "port not in range {}-{}" , PORT_RANGE.start (), PORT_RANGE.end (), )) } }
3.5 关联参数
依赖关系: 使用
requires(id | group)排斥关系 :使用
group().multiple(false).required(true)
1 2 3 4 5 6 7 8 9 10 11 12 13 14 15 16 17 18 .group ( ArgGroup::new ("vers" ) .multiple (false ) .required (true ) .args (["set-ver" , "major" , "minor" , "patch" ]), ) .arg ( arg!([INPUT_FILE] "some regular input" ) .value_parser (value_parser!(PathBuf)) .group ("input" ), ) .arg ( arg!(config: -c <CONFIG>) .value_parser (value_parser!(PathBuf)) .requires ("input" ), )
Derive vs Builder (2) 对比
Derive vs Builder
clap + rpassword 实现加密输入
对于密码、密钥等关键信息的输入,为了信息安全,我们一般会使用加密输出,clap
本身不支持加密输入功能。若你有这方面的需求,可以使用
rpassword crate 辅助完成。
示例:
1
2
3
4
5
6
7
8
9
10
11
12
13
14
15
16
17
18
19
20
21
22
23
24
25
26
use clap::Parser;use rpassword::read_password;#[derive(Parser)] #[command(version, author, about, long_about = None)] struct Cli { #[arg(short, long)] username: String , #[arg(short, long, required = true)] password: bool , } fn main () { let cli = Cli::parse (); let password = if cli.password { read_password ().expect ("Failed to read password" ) } else { "" .to_string () }; println! ("username: {}, password: {}" , cli.username, password); }
clap_complete 实现自动补全
要实现自动补全,需要在 .zshrc 或 .bashrc 等
SHELL 文件中加入命令自动补全脚本。这时候可以使用
clap_complete 来实现这个功能。
下面的示例目录结构如下:
1
2
3
4
5
6
├── Cargo.lock ├── Cargo.toml ├── build.rs └── src ├── cli.rs └── main.rs
首先我们需要引入 clap 和 clap_complete
crate,其中 clap_complete 只需在 build
环境下即可,所以我们的 Cargo.tmol 如下:
1
2
3
4
5
6
7
8
9
10
11
12
13
14
[package] name = "myapp" version = "0.1.0" edition = "2021" build = "build.rs" [dependencies] clap = { version = "4.5.1" }dirs = "5.0.1" [build-dependencies] clap = { version = "4.5.1" }clap_complete = "4.5.1"
我们先在 src/cli.rs 中实现一个简单的命令行程序
myapp :
1
2
3
4
5
6
7
8
9
10
11
12
13
14
use clap::{Arg, ArgAction, Command};pub fn build_cli () -> Command { Command::new ("myapp" ) .about ("Tests completions" ) .arg (Arg::new ("file" ) .help ("some input file" )) .subcommand (Command::new ("test" ) .about ("tests things" ) .arg (Arg::new ("case" ) .long ("case" ) .action (ArgAction::Set) .help ("the case to test" ))) }
我们主要是演示这个自动补全功能,为了省事,src/main.rs
中就不实现具体逻辑了:
1
2
3
4
5
mod cli;fn main () { let _m = cli::build_cli ().get_matches (); }
接着,我们在项目根目录下实现
build.rs,它将为我们指定的命令生成自动补全脚本:
1
2
3
4
5
6
7
8
9
10
11
12
13
14
15
16
17
18
19
20
21
22
23
24
use clap_complete::{generate_to, shells::Bash};use std::env;use std::io::Error;include!("src/cli.rs" ); fn main () -> Result <(), Error> { let outdir = match env::var_os ("OUT_DIR" ) { None => return Ok (()), Some (outdir) => outdir, }; let mut cmd = build_cli (); let path = generate_to ( Bash, &mut cmd, "myapp" , outdir, )?; println! ("cargo:warning=completion file is generated: {path:?}" ); Ok (()) }
你需要把其中的 myapp 替换为你的命令。
执行构建命令:
可以看到输出:
1
2
warning: myapp@0.1.0: completion file is generated: "/Users/hedon/RustroverProjects/learn-clap-complete/target/debug/build/myapp-42e401d08c044ca3/out/myapp.bash" Finished dev [unoptimized + debuginfo] target(s) in 1.90s
这里会输出生成脚本所在的位置,我这里是
/Users/hedon/RustroverProjects/learn-clap-complete/target/debug/build/myapp-42e401d08c044ca3/out/myapp.bash。
我的终端使用的是 zsh:
所以我需要将这个文件的内容加到 ~/.zshrc 文件的末尾:
1 cat /Users/hedon/RustroverProjects/learn-clap-complete/target/debug/build/myapp-42e401d08c044ca3/out/myapp.bash >> ~/.zshrc
重新加载配置文件:
这个时候你使用 myapp 命令的时候,按 tap
键,就有自动补全了:
1
2
➜ ./target/debug/myapp --help -h \[file\] help test
HTTPie
由于篇幅原因,实战 HTTPie 部分请看:Rust
实战丨 HTTPie
与 Go 语言 cobra 比较
Go 的 cobra 也是用于构建命令行应用程序的库,它在 Go
语言生态中非常受欢迎。
为了直观展示这 2
个库构建命令行应用程序的区别,我们来设计一个简单的命令行程序,用
clap 和 cobra
分别实现,以展示如何用这两个库实现相同的功能。
让我们创建一个 CLI 程序,它有一个 greet 子命令,接受一个
-n 或 --name 参数,并打印出一条欢迎信息。
Rust clap 实现
1 2 3 4 5 6 7 8 9 10 11 12 13 14 15 16 17 18 19 20 21 22 23 24 25 use clap::{ Parser, Subcommand};#[derive(Parser)] #[command(bin_name = "greet_app" )] struct Cli { #[command(subcommand)] sub: Option <Sub>, } #[derive(Subcommand)] enum Sub { Greet { #[arg(short, long)] name: String , } } fn main () { let cli = Cli::parse (); if let Some (sub) = cli.sub { match sub { Sub::Greet{name} => println! ("greeting: {:?}" , name), } } }
Go cobra 实现
1 2 3 4 5 6 7 8 9 10 11 12 13 14 15 16 17 18 19 20 21 22 23 24 25 26 27 28 29 30 31 32 33 34 35 36 37 package mainimport ( "fmt" "os" "github.com/spf13/cobra" ) var rootCmd = &cobra.Command{ Use: "greet_app" , Short: "A simple greeting application" , Long: `This is a simple greeting application with a greet command.` , } var greetCmd = &cobra.Command{ Use: "greet" , Short: "Greets a user" , Long: `Prints a greeting message for the specified user.` , Run: func (cmd *cobra.Command, args []string ) name, _ := cmd.Flags().GetString("name" ) fmt.Printf("Hello, %s!\n" , name) }, } func init () rootCmd.AddCommand(greetCmd) greetCmd.Flags().StringP("name" , "n" , "" , "Sets the name to greet" ) greetCmd.MarkFlagRequired("name" ) } func main () if err := rootCmd.Execute(); err != nil { fmt.Println(err) os.Exit(1 ) } }
输出:
1
2
3
4
5
6
7
8
9
10
11
12
13
14
This is a simple greeting application with a greet command . Usage: greet_app [command ] Available Commands: completion Generate the autocompletion script for the specified shell greet Greets a user help Help about any command Flags: -h, --help help for greet_app Use "greet_app [command] --help" for more information about a command .
对比
设计哲学和易用性
clap :
使用 Rust 的宏来提供强大的编译时功能,如参数解析、验证等。
利用 Rust 的类型安全特性,减少运行时错误。
支持通过派生宏自动从结构体生成命令行解析代码,简化开发流程。
cobra :
采用更传统的命令式编程模型,直观且易于上手。
通过组合命令对象来构建复杂的命令行应用。
提供了一套完整的生成工具来创建命令和配置,促进了开发速度。
功能和特性
clap :
自动生成帮助信息、版本信息等。
支持多级子命令。
支持自定义验证器和复杂的参数关系(如互斥、依赖等)。
cobra :
支持自动生成帮助文档。
内置命令自动补全脚本生成功能 。支持持久化命令行标志到配置文件 。通过插件支持增加额外的子命令。
能够轻松地与其他 Go 库集成,如 Viper 用于配置管理。
性能
clap :
由于 Rust 的编译时优化,clap
在解析命令行参数时通常会有更好的性能。
更少的运行时开销,尤其是在处理大量复杂命令行参数时。
cobra :
性能对于大多数命令行应用来说已经足够,但可能不如 clap
优化。
Go 的运行时可能会引入额外的开销,尤其是在并发处理时。

![#[command] 支持的元素](https://hedonspace.oss-cn-beijing.aliyuncs.com/img/image-20240301202114143.png)